Random thoughts of a fiber enthusiast - mostly fiber related, sometimes coherent

Category: Technique

Laces

I started spinning on my new Matchless this past weekend. No more clunking and rattling that I experienced with my old Matchless. Ah…peace and quiet. Except…wait! Why isn’t it drawing in? No matter how I adjust the scotch tension, it sometimes just refused to draw in. It felt as if some fiber was caught somewhere, and the twist doesn’t travel all the way to my drafting triangle. But it doesn’t happen all the time.

More research … I notice that this only happens when I use the hooks on the left side of the flyer, but doesn’t happen when I use the hooks on the right. I don’t see anything specifically, so … I think there is a burr in the orifice that only occurs when the yarn is drawing in from the left side of the orifice. My fingers are too fat to find the burr.

lacing

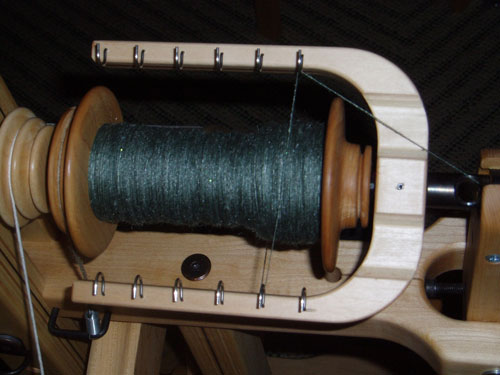
Then I remembered a tip that Judith showed me — lacing the yarn from side to side. This now has the yarn traveling through the orifice at the correct angle.

Lacing is useful when you are spinning a really fine yarn, and you want to reduce the take up. Why would you want to reduce the lace up? Reducing the take up allows you more time to put the twist that you need for a really fine yarn before the yarn winds on.

Lacing only works for spinning wheels whose hooks are on the same face of the flyer, such as the Majacrafts. This doesn’t work on the Ashford wheels, unless you add some more cup hooks on the flyer.

For now? I don’t need the extra time for the reason stated above. I need the extra time until weekend, when I can dig in the garage for my set of fine metal files and fix that darn burr.

Spinning Batts

After pulling out my haul on Sunday, I suddenly couldn’t resist the bright, cheery, fluffy, not to mention Christmas-y, corriedale batts from Grafton Fibers. I had purchased 2 red batts. The observant amongst you will have noticed that the batts are different. They had the same red base, but one had been carded with black, and the other a sunny orange. My plan was to spin each as a single and ply them together.

The question was, how to I approach this vision of loveliness? I unrolled the snail (but not the rolag), and saw that there was a color progression from one end of the rolag to the other. I wanted to preserve the color progression.

rolagstripped battI started to attenuate the rolag so I can spin off one end. But I wasn’t getting as much control over the fiber as I wished, and I was afraid that I was going to muddy the progression of colors. That I definitely didn’t want.

So, I unrolled the rolag and stripped the batt into a single long strip of roving. (See diagram at right) I carefully tore into the batt along the dotted lines to make a continuous strip.

Not only did this provide me with a long continuous strip of roving that preserved my color progression, but this also kept the fibers mostly aligned for a semi-worsted yarn. The rolag would have resulted in a pure woolen yarn.

I didn’t measure the widths of my strips, but just swagged it. If you want really even roving, you would want to pull it from a diz. For large batts like this, I usually make a really thick roving by pulling it through the hole in a CD. Again, by turning at each edge, you can get a long continuous roving.

I didn’t do that this time. I was too impatient. I wanted to spin RIGHT NOW. So, I spun both batts on my Matchless, and plied them up on Sunday night. Approximately 350 yards of beautiful red dk/worsted weight yarn. I even washed it to set the twist.

All before I went to bed on Sunday night. I paid for it on Monday morning. I was so groggy in the morning that I accidentally washed my hair with body wash instead of shampoo. Then I couldn’t understand why it was taking me so long to rinse the shampoo out. It just kept getting more and more sudsy. Threw my entire day off, I assure you.

But now, I get to figure out a scarf pattern for this lovely red yarn.

About Mobius Strips

Grace and I have been chatting over the past week on making mobius strips. Searching on the web on mobius strips, I found that there are quite a few directions for making mobius strips. Some are done by making a long strip, then grafting the start and end together after making a half twist. Some are done with that funky “knit into the bottom of the stitch” business that had always made my eyes crossed thinking about it. Then, there are the misnomers.

The last category is when you accidently put a twist in the cast on, when you are connecting it in a round. I’ve seen various places where people call it a mobius. It’s not. It’s just a full twist mistake.

First, let’s go back to the definition of a mobius. The mobius strip only has one edge and one surface.

Exercise #1:

  1. take a long strip of paper
  2. pull the ends together to form a loop (as you would when you make a paper chain)
  3. turn one end one half turn
  4. tape the ends together

What you have now has one edge and one surface. This is a mobius strip. The coolest and simplest 2 dimensional object in the world. Nay, universe. This is the first method for knitting a mobius scarf described in the first paragraph.

Exercise #2: Okay, let’s do another experiment.

  1. take a long strip of paper
  2. pull the ends together to form a loop
  3. turn one end a full turn
  4. tape the ends together.

Can you see the difference? The second loop has 2 edges and 2 surfaces. This is not a mobius strip. This is what happens when you accidently join your circular knitting with a single twist in the cast on.

Let’s take a look at this in terms of knitted fabric. Follow the link for the pictorial on knitting a mobius. I’ve moved it so that you don’t have to take a nap while waiting for this page to load unless you really, really want to see how I did it.

Page 8 of 8

Powered by WordPress & Theme by Anders Norén